


- Web templates
- E-commerce Templates
- CMS & Blog Templates
- Facebook Templates
- Website Builders
FAQs
General Tutorials
Featured templates
og体育首页ONE Subscrioption


This tutorial shows how to manage taxes in Oscommerce.
In order to manage taxes you should Open admin section and to go Locations/Taxes
1. In Countries section we can see list of countries for which you can set taxes. You can add or remove countries.

2. In Zones section you can set appropriate zones. For example you can specify country, city or state. It will allow you to set specific tax rates for particular city or state.

3. Tax Classes allows you to create separate Tax class which you can choose for product. Click on Add new Tax class and specify name for Tax class, save changes after that.

4. Now we need to set up Tax Zones. Open Tax zones item and click Insert. Create new Tax Zone, save changes. Open tax zone and add appropriate countries to Tax Zone. Modifications you can check on screenshot below.

5. Let’s set Tax Rates. Go to Tax Rates item. Click on New Tax Rate, and specify the following options: Tax Class Title, Zone, Tax Rate (%), Description. Save changes.

6. Now we need to open product in catalog and set tax for product. In Tax Class we should select appropriate class. Net and Gross price will be computed automatically.
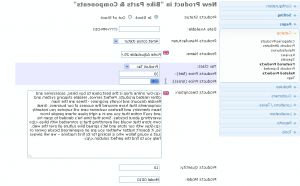
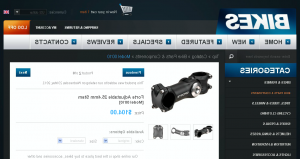
7. Open the product in front-end. We can see price without tax. Tax will show up at check out page.

8. Alternatively you can set price with tax. In this case price with tax will appear on your site. You should go to Configuration-My store and Display Prices with Tax to True option.

Below you can see result. Tax is included to price.
9. Add item to the cart and go to check out page. You will see product price and tax.

Feel free to check the detailed video tutorial below:
osCommerce. How to manage taxes